


Whisk & Wonder: November’s Featured Ideas
- Jennifer Preston
- Nov 11, 2025
- 8 min read


🍁 A Season of Gratitude & Creativity
As the leaves change and the air turns crisp, November is the perfect time to help kids think about what they’re thankful for. This month, a few of our wonderful caregivers are sharing their favorite fall crafts and treats, all filled with color, creativity, and heart.
🍁 Brenna created a Thankful Tree that helps little ones count their blessings leaf by leaf ~ a beautiful way to spark conversations about gratitude.
🍫 Haley whipped up No-Bake Pilgrim Hat Cookies that are as cute as they are delicious, perfect for tiny chefs who love helping in the kitchen.
🎨 Mary Charles brought the color with her Cardboard Turkey Craft, where every turkey becomes a one-of-a-kind masterpiece full of personality. She also shared two more fall favorites ~ Beaded Pipe Cleaner Corn and the Gratitude Chain, fun hands-on projects that make thankfulness a family affair.
🌾 Karen wrapped things up beautifully with her Pony Bead Napkin Rings, handmade treasures that double as sweet keepsakes for guests.
🍁 Thankful Tree Craft shared by Brenna
Beautiful way for little ones to express gratitude and it makes a great seasonal keepsake for your fridge or family table!
What You’ll Need
Large paper plate
Paint crayons
Black marker
White cardstock paper
Brown cardstock paper
Tree printable
Scissors
Pencil
Stapler
School glue
How to Make Them
Print out the leaf template on a sheet of white cardstock paper (one per child).
Have your child color each leaf using fall tones. Think red, yellow, and orange.
Using a black marker, write six things they’re thankful for inside the leaves.
Cut out the leaves and set them aside.
Take the paper plate and color it completely brown with a paint crayon.
To make the tree trunk, trace your child’s hand and part of their arm on brown cardstock.
Cut out the traced shape. This will be the trunk and branches of the tree.
Glue the colored “thankful leaves” all around the paper plate.
Staple or glue the handprint trunk to the bottom of the plate.
Add the phrase “I’m thankful for…” somewhere on the tree base.
Display proudly and enjoy a lovely reminder of gratitude this season!
🍂 Why We Love It
This craft encourages reflection, fine motor skills, and creativity. It’s a wonderful way for families to start meaningful conversations around thankfulness.


🍁 Directions submitted by Brenna ~ learn more about this amazing caregiver at https://www.30aandcoastalbabysitters.com/team/brenna
🍁 Photos from Glued to My Crafts
🦃 No-Bake Pilgrim Hat Cookies shared by Haley
Save your oven space for the turkey ~ these treats are ready in minutes.
What You’ll Need
Fudge Stripe Cookies ~ These form the perfect hat brim with their flat, chocolate-coated bottom.
Reese’s Peanut Butter Cups ~ Flipped upside down, they make the rounded top of the pilgrim hat.
Vanilla Frosting ~ Use white or tint it with food coloring (black, yellow, or orange all look great).
Festive Sprinkles or Sparkling Sugar ~ Add a little sparkle and holiday flair.
Reese’s Pieces ~ One candy makes the buckle for each hat.
How to Make Them
Prep your ingredients. Unwrap your peanut butter cups and place fudge stripe cookies chocolate-side down. (Tip: Chill the peanut butter cups for 15 minutes first ~ the wrappers come off easier!)
Add the frosting. Using a piping bag or frosting tube, pipe a ring of frosting around the base of each peanut butter cup. Leave the middle empty to prevent drips.
Assemble the hats. Press each peanut butter cup (upside down) onto the center of a cookie. Let a little frosting peek out ~ it looks like a hatband!
Add the sparkle. Sprinkle sparkling sugar or festive sprinkles on the frosting band.
Finish with a buckle.Dab a tiny bit of frosting on the back of a Reese’s Pieces and place it on the hatband.
Let them set. Allow a few minutes for the frosting to firm up. erve and enjoy!
🍂 Kids can decorate them however they’d like while talking about what they’re thankful for, making this a perfect pair with Brenna’s Thankful Tree Craft.


🍁 Directions/photos submitted by Haley ~ learn more about this amazing caregiver at https://www.30aandcoastalbabysitters.com/team/haley-l
🍁 Photos from Dinners, Dishes & deserts
🦃 Cardboard Turkey Craft shared by Mary Charles
Our creative queen Mary Charles slayed her way back this month with another festive favorite ~ a Cardboard Turkey Craft inspired by the incredible art teacher Cristina, whose colorful projects have inspired classrooms and art rooms everywhere.
What You’ll Need
Cardboard (cut into turkey body and neck shapes)
Glue gun (for adult use only)
Cardstock (cut into feather shapes)
Oil pastels
Pom-poms
Googly eyes
White school glue
How to Make It
Prep the shapes. Cut out two cardboard pieces ~ one for the turkey’s body and one for the neck and head.
Assemble the turkey. Use a glue gun to attach the neck piece to the body, overlapping slightly so it’s sturdy.
Set up the art station. Lay out all your supplies: feathers, oil pastels, glue, pom-poms, googly eyes, and cardstock. Kids love choosing their own materials and colors!
Create those feathers. Let kids color, design, and decorate each feather however they like ~ this is where the creativity really shines.
Glue it all together. Attach the feathers, eyes, and pom-poms using white school glue. Adults can help with any tricky pieces.
Admire the masterpiece. Every turkey will come out unique ~ colorful, silly, and full of personality!


🍁 Idea submitted by Mary Charles ~ learn more about this amazing caregiver at https://www.30aandcoastalbabysitters.com/team/mary-charles-
🍁 Directions/Photos from Art Bar
🌽Beaded Pipe Cleaner Corn shared by Mary Charles
If you’re looking for a Thanksgiving craft that’s colorful, hands-on, and easy enough for all ages ~ this Beaded Pipe Cleaner Corn is a total winner! It’s simple, inexpensive, and looks surprisingly realistic.
You’ll Need
4 tan pipe cleaners (12-inch length)
Plastic pony beads (around 120 total) in warm, harvest colors ~ gold, orange, red, brown, and cream work beautifully
How to Make It
Start with the base. Line up your four pipe cleaners so the ends are even. Twist them together tightly in the center to form a star shape.
Add the beads.Thread beads onto each arm of the star, mixing up the colors to create a natural corn look. You’ll need about 15 beads per section, leaving about an inch of pipe cleaner showing at the ends.
Shape your corn. Once all the arms are filled, carefully bend them upward and bring the tops together. Twist the ends a few times to secure them, this creates the “husks.”
Fan out the husks. Spread out the remaining pipe cleaner tips so they look like the dried leaves on real corn.
Add the finishing touches. Arrange your colorful mini ears in a bowl, string them into a garland, or make one for each place setting at Thanksgiving dinner.
🍂 How cute would these look resting on top of each dinner plate before the meal begins? Add a little name tag, and you’ve got instant handmade place cards that bring extra color and heart to the table.


🍁 Idea submitted by Mary Charles ~ learn more about this amazing caregiver at https://www.30aandcoastalbabysitters.com/team/mary-charles-
🍁 Directions/Photos from One Little Project
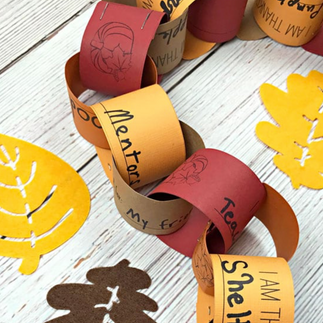
💛 Gratitude Chain shared by Mary Charles
Thanksgiving is about more than just turkey and pie ~ it’s about gratitude and taking time to reflect on all the good things in our lives! This Gratitude Chain activity (inspired by Carla Schauer’s printable version) is a simple and heartfelt way to bring everyone together ~ kids, parents, grandparents, and friends ~ to celebrate thankfulness in a colorful, creative way.
You’ll Need
Fall-colored cardstock or construction paper
Paper trimmer or scissors
Black marker or pen
Quick-drying glue or a stapler
Optional: Print Carla’s pre-designed “thankful strips” to make it even easier to get started!
How to Make It
Prep the paper strips. Cut your colored cardstock into long strips, about 1 inch wide. (You can print pre-made strips if you prefer!)
Write what you’re thankful for.Have each person write one thing they’re grateful for on a strip ~ big or small! Encourage kids to think about people, experiences, or even favorite moments from the year.
Make the first link.Take one strip, loop it into a circle, and secure the ends together with glue or a stapler.
Keep it growing! Thread the next strip through the first loop before closing it, creating an interlocking chain. Keep adding more and more strips as everyone contributes their thoughts of gratitude.
Display your chain. Hang it across a mantel, wrap it around the table centerpiece, or drape it along the staircase. Watching your chain grow longer throughout the evening is a beautiful reminder of how much there is to be thankful for!
🍂 This craft is quick, meaningful, and easy for all ages. It’s a perfect after-dinner or between-desserts activity ~ no screens, no cleanup fuss, just laughter and gratitude filling the room.
We especially love the idea of keeping your Gratitude Chain and adding to it each year ~ creating a growing family tradition that reminds everyone how many blessings they’ve shared. 🌟
Save the pdf file to your device, then print as many as you need for your Thanksgiving or Friendsgiving gathering. I recommend around 5 strips (1 page) per guest.


🍁 Idea submitted by Mary Charles ~ learn more about this amazing caregiver at https://www.30aandcoastalbabysitters.com/team/mary-charles-
🍁 Directions/Photos from Carla Schauer's Studio
🍽️Pony Bead Napkin Rings shared by Karen
Sometimes the sweetest details are the ones made by little hands. These are the perfect Thanksgiving craft for kids ~ easy, colorful, and full of meaning. With just a few supplies, children can create personalized napkin rings that double as place cards and take-home keepsakes for your guests.
It’s the kind of project you can imagine making as a kid and the kind that brings a smile to everyone at the table.
You’ll Need
Pipe cleaners (any color that fits your Thanksgiving theme)
Pony beads
Alphabet beads (to spell out words or names)
Napkins (cloth or paper)
How to Make the Napkin Rings
Choose your beads.Pick warm fall colors ~ orange, red, gold, brown, or even metallics for a festive touch.
Add your message. Use alphabet beads to spell out words like grateful, thankful, loved, or personalize each ring with a guest’s name.
String the beads. Slide the beads onto a pipe cleaner, leaving about an inch of space on each end.
Shape your ring. Wrap the beaded pipe cleaner around a folded napkin and twist the ends together in the back to secure it.
Finishing touch. Shape the ends neatly, or curl them slightly for a polished, decorative look.
Each napkin ring can double as a place holder and a take-home memento, reminding everyone of the love and gratitude shared around the table.
How to Make Beaded Bracelets
Measure and cut. Use a pipe cleaner or piece of stretch cord long enough to wrap around the child’s wrist with a little extra for tying or twisting.
String the beads. Let kids choose their favorite colors or spell out special words like joy, family, or blessed.
Secure it. Once full, twist the ends of the pipe cleaner together (or tie the cord in a double knot). Make sure there are no sharp wire edges.
Wear or gift it!These simple bracelets make fun matching accessories or sweet thank-you gifts for family and friends.
🍂 Whether wrapped around a napkin or worn on a wrist, these cheerful beaded creations are full of heart ~ a perfect reminder of togetherness and gratitude this season. 🌾🧡


🍁 Ideas submitted by Karen ~ learn more about this amazing caregiver at https://www.30aandcoastalbabysitters.com/team/karen
🍁 Photo from Art Bar
A Heartfelt Reminder
Whether you’re baking together, crafting with the kids, or simply sharing what you’re grateful for, these little moments of connection make the season special. This November, let’s slow down, get creative, and fill our homes with laughter, color, and gratitude. 💛


Comments