


Whisk & Wonder: October’s Featured Ideas
- Jennifer Preston
- Nov 4, 2025
- 5 min read


🎃 Double, Double, Toil & Trouble ~ Spooky Fun for Little Hands
Looking for a little Halloween magic to sprinkle into your week? ✨This month we are brewing up something special with three of our wonderful team members:
Fiona, Creative Contributor ~ One of Jennifer's adorable daughters
Karen, our VP of Operations
Misty, one of the amazing caregivers
They are sharing frightfully fun ideas that are perfect for sparking creativity, laughter, and connection with your little ones.
So grab your tiny witches and wizards and let the spooky fun begin.
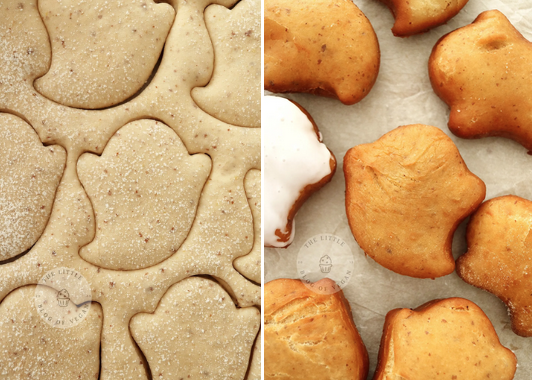
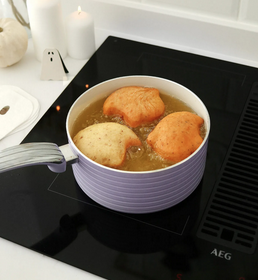
Vegan Ghost Doughnuts shared by our Little Creative Sidekick, Fiona!
Everyone is sure to love these Vegan Ghost Doughnuts ~ soft and pillowy with a raspberry jam filling and a smooth vanilla glaze. They’re super cute, spooky-sweet, and perfect for celebrating Halloween!
Vegan • No Eggs • No Dairy • Easy to Make
Fiona says they’re her “favorite Halloween snack ever.”
What You’ll Need
Dairy-free milk
Active dry yeast
Caster sugar
Flaxseed + water (for the flax “egg”)
Dairy-free butter
Vanilla extract
Self-raising flour
Sunflower oil
Fresh or frozen raspberries
Cornflour (cornstarch)
Lemon juice
Icing sugar
Black food gel
How to Make Them
Make the dough: Combine warm milk, yeast, and sugar. Once frothy, add the rest of the ingredients and knead until smooth. Let it rise until doubled.
Shape the ghosts: Roll the dough out, then use a ghost cookie cutter to create your spooky shapes. Let them rise again.
Fry to perfection: Fry each doughnut in hot oil until golden brown.
Make the jam filling: Simmer raspberries, sugar, and lemon juice until thick, then pipe into each doughnut.
Decorate: Dip each ghost in vanilla glaze and add little faces with black icing.
Why These Are a Must-Try
100% vegan and deliciously soft
Fun for kids to help make
Perfect for Halloween parties or cozy movie nights
Fiona-approved!
Fiona is our Little Creative Sidekick here at 30A & Coastal Babysitters. She helps dream up fun crafts, recipes, and creative ideas for families to enjoy together ~ because playtime and creativity go hand in hand!


Fiona picked this as her favorite Halloween treat to share!
Recipe & photos from Cupful of Kale 🎃 https://www.thelittleblogofvegan.com/2023/10/vegan-ghost-doughnuts.html
Witch’s Hat Cookie Cones 🔮shared by Karen
A sweet treat that is as easy as it is adorable ~ no cauldron required.
What You’ll Need
Sugar ice cream cones
Chocolate chips or melting chocolate
Fudge cookies (or any flat round cookie)
Sprinkles
Orange or purple icing
Mini marshmallows or candy eyes (optional)
How to Make Them
Melt the chocolate and dip the top rim of each cone into it.
Place the cone upside down onto the cookie to form a witch’s hat shape.
Add icing around the base as a hat band and sprinkle with magic (sprinkles).
Add a mini marshmallow or candy eye for a whimsical touch.
🕸 Perfect for Halloween parties, playdates, or after-school snacks. Kids will love decorating their own hats and showing off their spooky creations.


Idea submitted by Karen ~ learn more about this amazing caregiver at
Recipe & photos from Bullocksbuzz
Paper Bag Haunted House Craft 🏰shared by Karen
This paper bag haunted house is easy to set up and full of room for creativity. Kids can add cotton ball ghosts, sparkly windows, and silly bats. It is the perfect balance of simple materials and imaginative fun, and no two haunted houses will ever look the same. It also helps you use up leftover craft supplies while making a cute Halloween decoration to display at home.
What You’ll Need
Black, orange, white, purple, and green construction paper and sparkly paper
Paper bag
Glue
Scissors
Cotton balls or fake spider web
Small plastic spiders
Black, orange, and purple acrylic paint
Paintbrushes
How to Make It
Step 1 ~ Paint the Bag
Paint the paper bag with black, orange, or purple paint. Let kids choose their favorite color scheme.
Step 2 ~ Cut Decorations
While the paint dries, cut windows, doors, ghosts, bats, and pumpkins from construction paper or add spooky stickers. Add crooked windows or a funny front door for extra character.
Step 3 ~ Assemble the House
When the bag is dry, glue on the cutouts, stretch cotton or fake webbing for a ghostly effect, and add a few spiders. Use sparkly paper on the roof and finish with paper chimneys.


Idea submitted by Karen ~ learn more about this amazing caregiver at
Directions & photos from Happy Toddler Playtime
Old School Halloween Ghosts 👻 shared by Misty
A sweet and simple classic that uses fabric scraps and can be enjoyed every year.
You’ll Need
Fabric scraps cut to about 12 inches by 12 inches
Extra scraps for the head stuffing
Scissors
String or twine
Marker or googly eyes
How to Make It
Step 1 ~ Form the Ghost
Place a small ball of fabric in the center of a fabric square. Bring the corners together and tie with string to form the head. Or use a tissue wrapped around a sucker.
Step 2 ~ Add a Face
Draw eyes and a mouth or glue on googly eyes.
Step 3 ~ Hang Them Up
Tie several ghosts along a string to make a garland or hang them individually around the house.
Tip:
Mix different sizes and colors for a cheerful haunted look.


Idea submitted by Misty ~ learn more about this amazing caregiver at
Directions & photos from Little Green Radicals
No-Sew Ghost Costume 👻 Shared by Karen
Cute, cozy, and comfortable for trick-or-treating.
You’ll Need
White fleece about 30 x 50 inches
Black adhesive felt
Scissors
Ghost face template
How to Make It
Cut the Poncho ~ Fold fleece in half and cut a small neck hole. Trim the edges into strips and tie each one for fringe.
Add the Face ~ Cut eyes and a mouth from black felt and stick them on.
Make the Hat ~ Fold the extra fleece, shape it like a beanie, and glue or sew the sides.


Idea submitted by Karen ~ learn more about this amazing caregiver at
Directions & photos from Gina Michele
No-Sew Pineapple/Apple Costume 🍍/🍎 Shared by Karen
Bright, fun, and perfect for tropical-themed parties or a beachy Halloween look.
You’ll Need
One to one and a half yards of yellow felt
Green felt scraps for leaves
Cardboard circle for hat base
Hot glue, scissors, yarn, and ribbon
How to Make It
Create the Cape ~ Fold the felt, measure using a T-shirt as a guide, and cut a circular cape. Trim a small neck hole and a short front slit.
Add Details ~ Paint or draw crisscross lines to resemble pineapple texture. Cut arm slits if desired.
Make the Hat ~ Cut green felt leaves, roll and glue them together, and attach them to the hat base.


Directions & photos from Delia Creates 🎃 https://www.deliacreates.com/no-sew-pineapple-halloween-costume/
🧡 A Little Magic Goes a Long Way
Whether you are baking witch’s hats, crafting friendly ghosts, or giggling over pumpkin tacos, these simple ideas turn ordinary afternoons into lasting family memories.
From all of us at 30A and Coastal Babysitters, we hope your Halloween is filled with laughter, creativity, and a little bit of magic.


Comments